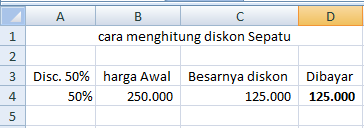
Are you looking to calculate discounts in Excel but not sure where to start? Look no further, as we have curated a comprehensive guide on how to accurately calculate discounts in Excel using the IF formula. Whether you are a seasoned Excel pro or a beginner, this guide will equip you with the knowledge and skills needed to execute discounts seamlessly in your daily tasks.
How to Calculate Discounts with the IF Function in Excel
Excel is a popular software used by businesses and individuals alike for data analysis and calculations. With its vast array of formulas and functions, Excel makes it easy to perform complex calculations, including discounts.
The IF function in Excel is a logical function that enables you to create conditional statements based on specified criteria. This function is particularly useful when calculating discounts, as it allows you to specify various conditions that determine the level of discount to be applied.
Here’s how to calculate discounts with the IF function in Excel:
Step 1: Choose a cell to contain the formula
The first step in calculating discounts with the IF function in Excel is to choose a cell to contain the formula. This cell will display the discounted price once the formula is applied.
Step 2: Use the IF function to specify the discount
The next step is to use the IF function to specify the discount amount based on the specified conditions. The formula for calculating discounts using the IF function in Excel is as follows:
=IF(condition, value_if_true, value_if_false)
The condition is the criteria you want to specify for the discount. For example, you may want to give a 10% discount on orders above $100. In this case, the condition would be “if the order is above $100.”
The value_if_true is the discount amount to be applied if the specified condition is true. In our example above, the discount amount would be 10%. This value can either be a fixed number (e.g. 10), or a percentage (e.g. 10%).
The value_if_false is the value that will be displayed if the specified condition is false. In our example above, this would be 0% as no discount would be applied if the order is less than $100.
Let’s go ahead and apply this formula to our Excel sheet:
As you can see, the formula applies a 10% discount to orders above $100, and no discount is applied to orders less than $100.
Step 3: Test the formula
Once you have applied the formula, it is important to test it to ensure it is working correctly. To do this, simply enter various values into the cell you specified for the formula and verify that the discount is being applied correctly.
FAQ
Q1. Can I apply multiple conditions when calculating discounts with the IF function in Excel?
Yes, you can apply multiple conditions when calculating discounts with the IF function in Excel. This can be done by nesting IF functions within one another. Here’s an example of how to nest IF functions:
=IF(A2>1000,IF(A2<2000,10%,IF(A2<3000,15%,20%)),0%)
In this example, we have created three nested IF functions. These functions apply a 10% discount if the order is above $1000 and less than $2000, a 15% discount if the order is above $2000 and less than $3000, and a 20% discount if the order is above $3000. If the order is less than $1000, no discount is applied.
Q2. Can I use the same formula to calculate discounts in Google Sheets?
Yes, you can use the same formula to calculate discounts in Google Sheets. The IF function is also available in Google Sheets, and the syntax is identical to that of Excel. Simply enter the formula into the desired cell, and the discount will be calculated automatically.
Video Tutorial - How to Calculate Discounts with the IF Function in Excel
For a more detailed demonstration on how to calculate discounts with the IF function in Excel, check out this video tutorial:
