Are you struggling to unprotect your Excel sheet? If yes, then this article is for you. We understand how frustrating it can be to forget or lose the password to unprotect your Excel sheet. With the following methods, you can unprotect your Excel sheet in a matter of minutes.
 3 Cara Unprotect Excel Mudah Terbaru Yang Patut Kamu Coba
If you are looking for a simple and easy way to unprotect your Excel sheet, you have come to the right place. In this section, we will discuss three different methods to unprotect your Excel sheet.
Method 1. Using a VBA Macro
This method involves creating a VBA macro to unprotect your Excel sheet. Follow the steps below:
- Open the Excel sheet that you want to unprotect.
- Press Alt + F11 to open the Visual Basic Editor.
- Click on Insert > Module.
- Copy and paste the following code into the module:
Sub Unprotect()

Dim strPassword As String

strPassword = InputBox("Enter password", "Password")

ActiveSheet.Unprotect Password:=strPassword

End Sub
- Press F5 to run the macro.
- Enter the password to unprotect the sheet when prompted.
- Your Excel sheet is now unprotected!
It is important to note that this method only works if the sheet is protected with a password.
Method 2. Using Passper for Excel
If you have forgotten the password to unprotect your Excel sheet, you can use Passper for Excel to remove the password. Follow the steps below:
- Download and install Passper for Excel on your computer.
- Open Passper for Excel and click on Remove Restrictions.
- Click on the Add button and select the Excel sheet that you want to unprotect.
- Click on the Remove button to remove the password.
- Your Excel sheet is now unprotected!
Passper for Excel is a reliable tool that can remove passwords from Excel sheets without any data loss.
Method 3. Using ZIP Software
This method involves changing the Excel file extension from .xlsx to .zip, and then extracting the XML files. Follow the steps below:
- Make a copy of the Excel sheet that you want to unprotect.
- Change the file extension from .xlsx to .zip.
- Right-click on the file and select Extract All.
- Open the extracted folder and navigate to xl > worksheets.
- Open the XML file of the sheet that you want to unprotect.
- Find the following tag: <sheetProtection algorithmName=”SHA-512″ hashValue=”…” saltValue=”…” spinCount=”…”>
- Delete the tag and save the XML file.
- Zip the folder back and change the file extension from .zip to .xlsx.
- Your Excel sheet is now unprotected!
This method is a bit complicated, but it works if you have forgotten the password to unprotect your Excel sheet.
 [100% Workable]How to Unprotect Excel Sheet with/without Password in 2020
If you are looking for a detailed guide on how to unprotect your Excel sheet with or without a password, this section is for you.
Step 1. Know the Password
If you know the password to unprotect your Excel sheet, follow these steps:
- Open the Excel sheet that you want to unprotect.
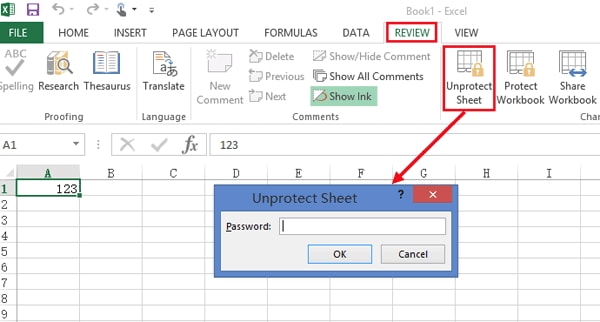
- Click on the Review tab and then click on Unprotect Sheet.
- Enter the password and click on OK.
- Your Excel sheet is now unprotected!
Step 2. Don’t Know the Password
If you have forgotten the password to unprotect your Excel sheet, follow these steps:
- Use the VBA Macro method or Passper for Excel method mentioned above to remove the password.
- Use the ZIP Software method mentioned above to unprotect the sheet.
These methods are effective in removing the password and unprotecting the Excel sheet.
FAQ
1. Can I unprotect an Excel sheet without the password?
Yes, you can use Passper for Excel or the ZIP Software method to unprotect an Excel sheet without the password.
2. Will unprotecting an Excel sheet remove the password permanently?
If you use a VBA Macro to unprotect an Excel sheet, the password will remain in the code. If you use Passper for Excel or the ZIP Software method to unprotect the sheet, the password will be permanently removed.
Video Tutorial
Watch the following video tutorial to learn how to unprotect an Excel sheet:
 3 Cara Unprotect Excel Mudah Terbaru Yang Patut Kamu Coba
 [100% Workable]How to Unprotect Excel Sheet with/without Password in 2020