As technology advances at a rapid pace, digital security has become a crucial aspect of our lives. Protecting sensitive data is not only important for businesses or organizations, but also for the average individual. File encryption is a practical method of securing your data, and one popular way to do this is by password protecting your files. In this article, we will explore the steps for password protecting different types of files.
How to Password Protect a Word Document
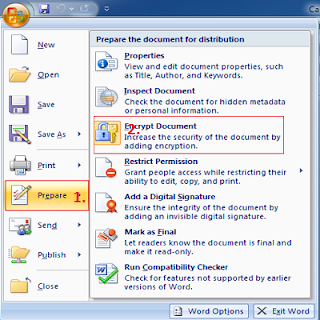
Microsoft Word is widely used for creating documents such as reports, resumes, and letters. It is also necessary to password protect confidential documents since Word documents can be easily accessed and edited by anyone who has access to them. Here is a step-by-step guide to password protect your Word document:
Step 1: Open the Document You Want to Password Protect
Firstly, you need to open the Word document you want to password protect.
Step 2: Click on File
Once the document is open, click on ‘File’ at the top left corner of the window. A dropdown menu will appear.
Step 3: Click on Info
Select ‘Info’ from the dropdown menu.
Step 4: Click on Protect Document
Under ‘Info’, you will see the option to ‘Protect Document.’ Click on this option.
Step 5: Select ‘Encrypt with Password’
Once you click on ‘Protect Document’, a dropdown menu will appear. Select ‘Encrypt with Password’ from this menu.
Step 6: Enter Your Password
A dialog box will appear asking you to enter a password. Choose a secure password that only you know and enter it in the box.
Step 7: Re-Enter Your Password
You will need to re-enter your password to confirm it. This will ensure that you have entered the correct password.
Step 8: Click on OK
Once you have entered and confirmed your password, click on ‘OK.’ Your Word document is now password protected.
How to Password Protect an Excel Document
Microsoft Excel is widely used for creating spreadsheets such as budget plans, financial statements, and inventory tracking. It is crucial to password protect confidential spreadsheets as well. Here is a step-by-step guide to password protect your Excel document:
Step 1: Open the Document You Want to Password Protect
Similarly, you need to open the Excel document you want to password protect.
Step 2: Click on File
Once the document is open, click on ‘File’ at the top left corner of the window.
Step 3: Click on Info
Select ‘Info’ from the dropdown menu.
Step 4: Click on Protect Workbook
Under ‘Info’, you will see the option to ‘Protect Workbook.’ Click on this option.
Step 5: Select ‘Encrypt with Password’
Once you click on ‘Protect Workbook,’ a dropdown menu will appear. Select ‘Encrypt with Password’ from this menu.
Step 6: Enter Your Password
A dialog box will appear asking you to enter a password. Choose a strong password that only you know and enter it in the box.
Step 7: Re-Enter Your Password
You will need to re-enter your password to confirm it. This will ensure that you have entered the correct password.
Step 8: Click on OK
Once you have entered and confirmed your password, click on ‘OK.’ Your Excel document is now password protected.
How to Password Protect a RAR/ZIP File
RAR/ZIP files are commonly used to compress large files for easy sharing, and password protecting them ensures that the information remains confidential. Here is a step-by-step guide to password protect your RAR/ZIP file:
Step 1: Install WinRAR or 7-Zip
You will need to install WinRAR or 7-Zip before password protecting your RAR/ZIP file. Both programs are available for download from their respective websites.
Step 2: Select the File You Want to Password Protect
Right-click on the RAR/ZIP file you want to password protect, then select ‘Add to archive’ from the dropdown menu.
Step 3: Select the Compression Method
In the ‘Archive name and parameters’ menu, select the compression method you want to use.
Step 4: Go to the ‘Advanced’ Tab
Click on the ‘Advanced’ tab in the ‘Archive name and parameters’ menu. Here you can enter your password under ‘Set Password.’ Once you have entered your password, click on ‘OK.’ Your RAR/ZIP file is now password protected.
FAQs
How can I ensure that my password is secure?
You can ensure that your password is secure by using a combination of letters, numbers, and symbols, and making it at least 8 characters long. Avoid using common words or personal information such as your name or date of birth. Remember to keep your password private and not share it with anyone else.
Can I remove the password protection from a file?
Yes, you can remove the password protection from a file. Open the password-protected file and enter the password. Then, go to the ‘File’ menu and select ‘Info.’ Click on ‘Protect Document’ or ‘Protect Workbook,’ then select ‘Encrypt with Password.’ Delete the password you entered before and click on ‘OK.’ The password protection has now been removed from your file.
Video Tutorial for Password Protecting a Word Document, Excel Document, and RAR/ZIP File
If you’re a visual learner, check out this video tutorial which covers password protecting Word documents, Excel documents, and RAR/ZIP files:
With these simple steps, you can easily password protect your files and ensure that your confidential data remains secure. Remember to choose a strong password and keep it private. By taking these simple precautions, you can prevent unauthorized access and protect your sensitive information.


