Excel is a powerful tool when it comes to organizing data and performing calculations, but did you know that you can also use it to protect your work? By locking specific cells or encrypting your files, you can prevent others from copying, opening, or editing your work without your permission. In this article, we’ll cover some tips and tricks for securing your Excel files.
Cara Mengunci File Excel Agar Tidak Bisa Dicopy, Dibuka, dan Diedit
If you want to prevent others from accessing or modifying your Excel file, there are several steps you can take to lock it down. Here are three methods:
1. Protect the Worksheet or Workbook
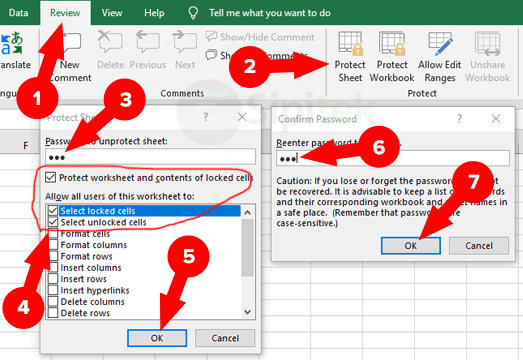
One way to prevent unauthorized changes is to protect the worksheet or workbook. To do this, go to the Review tab and select “Protect Sheet” or “Protect Workbook”. You’ll be prompted to enter a password, which will be required to make any changes to the file.
Keep in mind that protecting the worksheet or workbook will only prevent changes to the structure of the file, such as adding or deleting sheets. It won’t stop others from copying or viewing the data. If you want to prevent copying, you’ll need to use a different method.
2. Lock Specific Cells or Ranges
If you only want to protect certain cells or ranges, you can do so by selecting the cells, right-clicking, and choosing “Format Cells”. Then go to the “Protection” tab and check the “Locked” box. This will prevent changes to those cells unless the worksheet or workbook is protected using a password.
3. Encrypt the File
If you want to prevent others from viewing or copying your Excel file altogether, you can encrypt it using a password. To do this, go to the File tab, choose “Info”, and select “Protect Workbook”. Then choose “Encrypt with Password” and enter a password. This will encrypt the entire workbook, and anyone who wants to open it will need to enter the password.
Formulas and Functions in Excel
Excel isn’t just for organizing data and making charts – it’s also a powerful tool for performing calculations. With hundreds of built-in formulas and functions, you can automate complex calculations and save yourself a lot of time and effort. Here are five tips for working with formulas and functions in Excel:
1. Use the AutoSum Function
If you need to add up a column or row of numbers, you can use the AutoSum function to do it quickly. Simply select the cell where you want the total to appear, click the AutoSum button on the Home tab, and Excel will automatically add up the selected cells.
2. Name Your Ranges
If you’re working with a large dataset, it can be helpful to name your ranges so you can refer to them more easily in your formulas. To do this, select the cells you want to name, go to the Formulas tab, and choose “Define Name”. Then enter a name for the range, and you can use it in your formulas by entering “=name” instead of “=A1:B4”, for example.
3. Use Absolute References
When you copy a formula to another cell, Excel will often adjust the references automatically. If you want to keep a reference to a specific cell or range, you can use an absolute reference by adding a “$” before the column and row. For example, if you enter “=$A$1” in a formula, it will always refer to cell A1, no matter where you copy the formula.
4. Understand the Order of Operations
When you’re working with complex formulas that include multiple operations, it’s important to understand the order of operations. Excel follows the same rules as math, where multiplication and division are performed before addition and subtraction. If you’re not sure, you can add parentheses to make sure Excel performs the calculations in the order you want.
5. Use IF Statements for Conditional Formatting
If you want to apply formatting to cells based on certain conditions, you can use an IF statement in a formula. For example, if you want to highlight cells that contain values over a certain threshold, you can use the formula “=IF(A1>10, “Yes”, “No”)”, which will return “Yes” if the value in A1 is greater than 10, and “No” if it’s not.
FAQ
1. Can I Lock Certain Rows or Columns in Excel?
Yes, you can lock certain rows or columns in Excel by selecting the row or column you want to lock, right-clicking, and choosing “Format Cells”. Then go to the “Protection” tab and check the “Locked” box. After that, you can protect the worksheet or workbook as described above, and the locked rows or columns will remain visible but can’t be modified.
2. How Do I Remove a Password from an Excel File?
If you’ve forgotten the password for an Excel file or you want to remove the password altogether, you can do so by going to the File tab, choosing “Info”, and selecting “Protect Workbook”. Then choose “Encrypt with Password” and delete the password. This will remove the encryption from the workbook and anyone can open it without a password.
In conclusion, Excel is more than just a simple spreadsheet program. With a little knowledge of its advanced features, you can protect your data, automate calculations, and save yourself a lot of time and effort. Try out some of these tips and see how they can help you take your Excel skills to the next level!


