Have you ever wondered how to make your work in Microsoft Excel more efficient and faster? Well, the answer is macros! Macros are a series of commands and operations that can be saved and replayed to automate complex or repetitive tasks in Excel. In this article, we’ll be covering the basics of how to install, activate, edit, and create macros in Excel. Let’s dive in!
Installing Macros in Microsoft Excel
The first step to using macros in Excel is installing them. Here’s how:
- Open Microsoft Excel and click on the “Developer” tab in the ribbon. If you can’t see the Developer tab, go to the “File” menu, then click on “Options,” and select “Customize Ribbon” to add the tab.
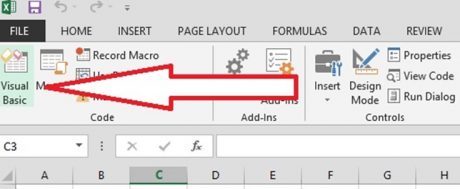
- Click on “Visual Basic” to open the Visual Basic Editor.
- Click on “File,” then “Import File” to import the macro file you want to use.
- Save the workbook to keep the macro enabled in the future.
Now that the macro is installed, let’s move on to activating it.
Activating Macros in Microsoft Excel
By default, Excel disables any macros to protect you from potentially harmful code. However, you can activate macros by following these steps:
- Click on the “Developer” tab in the ribbon.
- Click on “Macro Security” to open the Macro Security Settings.
- Select “Enable all macros” or “Enable only digitally signed macros”.
- Click “OK” to save the changes.
Now that the macro is activated, you can use it to automate tasks. But what if you need to edit an existing macro or create a new one? Let’s find out how.
Editing Macros in Microsoft Excel
If you need to make changes to an existing macro, you can open and edit the code in the Visual Basic Editor. Here’s how:
- Click on the “Developer” tab in the ribbon.
- Click on “Visual Basic” to open the Visual Basic Editor.
- Find the macro you want to edit in the “Project Explorer” window on the left-hand side.
- Double-click on the macro to open the code editor.
- Make the necessary changes to the code, then click “Save” to save the changes.
Now, what if you need to create a new macro from scratch? Don’t worry, we’ve got you covered!
Creating Macros in Microsoft Excel
Creating a new macro in Excel involves recording your actions and commands, then saving the recorded macro as a module. Here’s a step-by-step guide:
- Click on the “Developer” tab in the ribbon.
- Click on “Record Macro” to start recording your actions.
- Give the macro a name and choose where to save it.
- Choose whether to save it for the current workbook only or for all workbooks.
- Click “OK” to start recording.
- Perform the actions and commands you want to automate.
- Click on “Stop Recording” to end the recording process.
- Finally, save and close the workbook to keep the macro enabled.
That’s it! Now you can use your newly created macro to automate tasks in Excel.
Frequently Asked Questions
1. What are some common uses for macros in Excel?
Macros can be used to automate a wide range of tasks in Excel, including:
- Generating reports and charts
- Repeating common formatting tasks
- Extracting and transforming data
- Automating data entry
- Performing complex calculations
2. Are macros safe to use in Excel?
Macros can potentially contain harmful code or viruses, so it’s important to only enable macros from trusted sources. Always make sure to verify the macro’s code and the source of the macro before enabling it. It’s also a good idea to keep your anti-virus software up-to-date to protect your computer from any potential threats.
Video Tutorial: How to Create a Macro in Excel
That’s it for our beginner’s guide to macros in Microsoft Excel. Now that you know how to install, activate, edit, and create macros, you can start automating your tasks and saving time and effort. Happy Excel-ing!


