As we continue to work with data, it’s important to be able to convert files from one format to another. In this article, we’ll explore how to convert CSV files to Excel format. Before we dive in, let’s quickly define what these file formats are.
CSV Files
CSV stands for “comma-separated values”. A CSV file is a plain text file that uses a comma to separate values. Each line in the file represents a row, and the values in each row are separated by commas. Here’s an example:
In this example, we have a CSV file that contains information about customers. The first row of the file contains the column headings, and each subsequent row contains information about a customer. The values in each row are separated by commas.
Excel Files
Excel is a popular spreadsheet program that allows you to organize and analyze data. Excel files are binary files that are created and saved using Microsoft Excel. They can contain multiple sheets, each with its own set of data. Here’s an example:
In this example, we have an Excel file that contains information about sales for different regions. Each sheet in the file contains information about sales for a different region. The data is organized into rows and columns, and can easily be sorted and analyzed using Excel’s built-in features.
Converting CSV Files to Excel
Now that we know what CSV and Excel files are, let’s explore how to convert CSV files to Excel format. There are a few different methods you can use to do this.
Method 1: Using Excel’s Open feature
The easiest way to convert a CSV file to Excel format is to simply open the CSV file in Excel. Here’s how:
- Open Excel.
- Click on the “File” tab.
- Click on “Open”.
- Find and select the CSV file you want to convert.
- Click on the “Open” button.
- Excel will automatically convert the CSV file to Excel format.
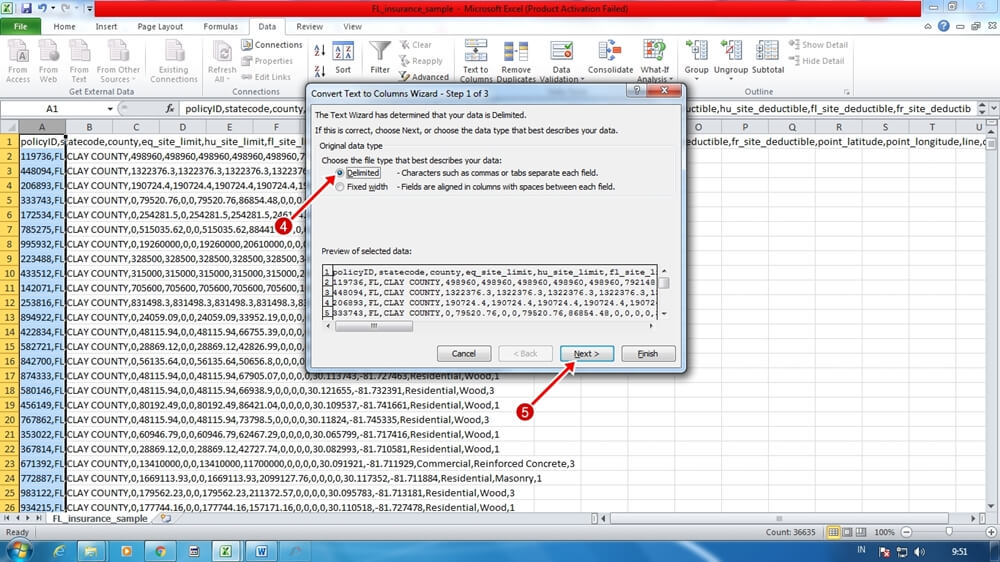
Method 2: Using the Text Import Wizard
If you need more control over how the CSV file is converted to Excel format, you can use Excel’s Text Import Wizard. Here’s how:
- Open Excel.
- Click on the “Data” tab.
- Click on “From Text/CSV”.
- Find and select the CSV file you want to convert.
- Click on the “Import” button.
- Follow the steps in the Text Import Wizard to specify how you want the CSV file to be converted to Excel format.
By using the Text Import Wizard, you can specify things like the delimiter that should be used to separate values, the format of date and time values, and the column widths.
FAQ
1. Why would I need to convert a CSV file to Excel format?
There are several reasons why you might need to convert a CSV file to Excel format:
- If you want to analyze the data using Excel’s built-in features, such as sorting and filtering.
- If you want to create charts or graphs based on the data.
- If you need to share the data with someone who doesn’t have a program that can open CSV files.
2. Can I convert an Excel file to CSV format?
Yes, you can convert an Excel file to CSV format. To do this, simply save the Excel file as a CSV file. Here’s how:
- Open the Excel file you want to convert.
- Click on the “File” tab.
- Click on “Save As”.
- Select “CSV (Comma delimited) (*.csv)” from the “Save as type” dropdown menu.
- Choose a location to save the file, and give it a name.
- Click on the “Save” button.
Excel will save the file in CSV format, which can be opened in any program that can read CSV files.
Conclusion
Converting CSV files to Excel format is a simple process that can be done using Excel’s built-in features. Whether you need to analyze the data, create charts or graphs, or share the data with others, converting a CSV file to Excel format can make it easier to work with. If you need more control over how the data is converted, you can use Excel’s Text Import Wizard to specify the exact format you want. With these tools at your disposal, you can work with your data in the format that works best for you.

