Do you ever find yourself wishing you could open two applications at the same time on your screen? Well, you’re in luck because there’s a way to do just that! This article will show you how to open two applications side by side on both Windows 8.1 and Windows 10. With just a few simple steps, you’ll be multitasking like a pro!
How to Open Two Applications Side by Side on Windows 8.1
If you’re using Windows 8.1, you’ll be happy to know that opening two applications side by side is a breeze!
Step One: Open the First Application
The first thing you’ll need to do is open the first application you want to use. You can do this by clicking on the application’s icon on the taskbar or by searching for it in the Start menu.
Step Two: Snap the Application to One Side of the Screen
Once you have the first application open, you’ll need to snap it to one side of the screen. To do this, click and hold the title bar of the application and drag it to the left or right side of the screen until you see a gray rectangle appear.
Step Three: Open the Second Application
With the first application snapped to one side of the screen, you can now open the second application. You can do this by clicking on its icon on the taskbar or by searching for it in the Start menu.
Step Four: Snap the Second Application to the Other Side of the Screen
Once you have the second application open, you’ll need to snap it to the other side of the screen. To do this, click and hold the title bar of the application and drag it to the opposite side of the screen until you see a gray rectangle appear.
Step Five: Adjust the Size of the Applications
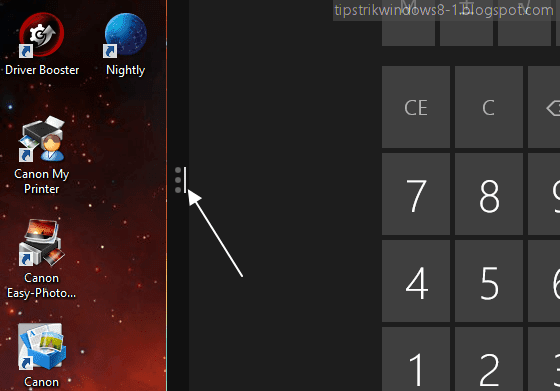
Now that you have both applications open side by side, you can adjust their size to your liking. To do this, click and hold the vertical black line that separates the two applications, and drag it left or right to make one application larger or smaller.
How to Open Two Applications Side by Side on Windows 10
If you’re using Windows 10, opening two applications side by side is just as easy as it is on Windows 8.1. Here’s how:
Step One: Open the First Application
Like on Windows 8.1, the first thing you’ll need to do is open the first application you want to use. You can do this by clicking on the application’s icon on the taskbar or by searching for it in the Start menu.
Step Two: Snap the Application to One Side of the Screen
Once you have the first application open, you’ll need to snap it to one side of the screen. To do this, drag the title bar of the application to the left or right side of the screen until you see a gray rectangle appear.
Step Three: Open the Second Application
With the first application snapped to one side of the screen, you can now open the second application. You can do this by clicking on its icon on the taskbar or by searching for it in the Start menu.
Step Four: Snap the Second Application to the Other Side of the Screen
Once you have the second application open, you’ll need to snap it to the other side of the screen. To do this, drag the title bar of the application to the opposite side of the screen until you see a gray rectangle appear.
Step Five: Adjust the Size of the Applications
Just like on Windows 8.1, you can adjust the size of the applications to your liking by clicking and holding the vertical black line that separates the two applications and dragging it left or right.
FAQ
Q: Can I open more than two applications side by side?
A: Yes, you can! Starting with Windows 10 version 1903, you can open up to four applications side by side. To do this, follow the same steps for opening two applications side by side, and then drag and drop the third and fourth applications into the open spaces.
Q: Can I use the Snap feature on a touchscreen device?
A: Absolutely! The Snap feature works on touchscreen devices just like it does on devices with traditional keyboards and mice. To snap an application to one side of the screen, simply drag the top of the application to the left or right side of the screen until the gray rectangle appears.

