Microsoft Excel has been the go-to software for businesses, organizations, and individuals when it comes to data management, analysis, and presentation. Excel is a spreadsheet software that provides users with the tools to organize, calculate, analyze, and visualize data in a quick and efficient manner. One of the best features of Excel is its ability to transform rows into columns and vice versa, which is a useful skill for anyone working with data. In this article, we will discuss how to change column to row in Excel, how to create lines in Excel, and how to make text appear on two lines in Excel using simple step-by-step instructions.
How to Change Column to Row in Excel
Switching rows and columns is a simple technique that can save you a lot of time when you’re working with spreadsheets. Here’s how to do it in Excel:
- Select the data in the spreadsheet that you want to transform into columns or rows
- Right-click to bring up the context menu and select “Copy” or use the shortcut “Ctrl+C”
- Click the adjacent cell in the spreadsheet where you want to transform the data
- Then, right-click to bring up the context menu and select “Paste Special” or use the shortcut “Ctrl+Alt+V”
- In the “Paste Special” dialog box, select the check box labeled “Transpose”
- Click “OK” to transform the data into rows or columns
By following these simple steps, you’ll be able to transform any set of data from rows to columns or vice versa in Excel. This technique is particularly useful when you have a large amount of data and you need to change the orientation quickly.
How to Create Lines in Excel
When you’re working with spreadsheets, it’s often helpful to visually separate different sections to make it easier to read and analyze the data. Creating lines in Excel is a simple way to accomplish this task, and here’s how to do it:
- Select the cells where you want to create lines
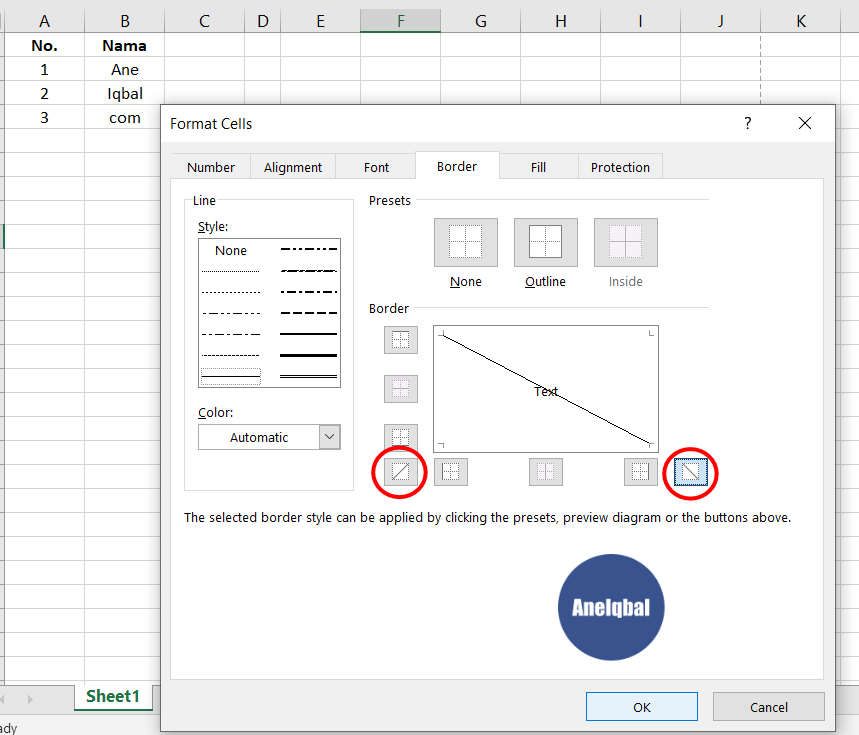
- Right-click to bring up the context menu and select “Format Cells” or use the shortcut “Ctrl+1”
- Click the “Border” tab in the “Format Cells” dialog box
- Select the type of border you want to create by clicking the corresponding icon (top, bottom, left, right, diagonal)
- Choose the line style, color, and width from the options available
- Click “OK” to add the border to the selected cells
With this simple technique, you’ll be able to add lines to any section of your spreadsheet, making it easier to read, analyze, and understand the data at a glance.
How to Make Text Appear on Two Lines in Excel
When you’re creating labels or headings in your spreadsheet, you may find that the text is too long and doesn’t fit into the cell. One solution to this issue is to split the text into two lines. This is how it’s done:
- Select the cell where you want to split the text into two lines
- Double-click the cell to enter edit mode or use the shortcut “F2”
- Place the cursor at the point where you want to split the text into two lines
- Press “Alt+Enter” to break the text into two lines
- Click “Enter” to save the changes
By using this simple technique, you can make your labels and headings more readable and visually appealing in your spreadsheet. This can make a big difference in the overall look and feel of your data presentation.
Frequently Asked Questions
Q: Can I switch back to columns after I’ve transformed them into rows?
A: Yes, you can easily switch back to columns by following the same steps discussed above, but instead of selecting the “Transpose” checkbox, leave it unchecked.
Q: How can I remove the borders in my Excel spreadsheet?
A: To remove borders in Excel, select the cells where you want to remove the border, right-click to bring up the context menu, select “Format Cells”, click the “Border” tab, select “None” from the drop-down menu, and click “OK”.
Conclusion
Excel is an impressive tool that can help you organize, analyze, and present your data in a clear and effective manner. Whether you’re switching rows into columns, adding lines to your spreadsheet, or making text appear on two lines, Excel provides all the tools you need to do the job right. By learning these basic techniques, you’ll be able to work efficiently and effectively with Excel, saving time and improving your data presentation skills.
For more information and guides on Excel, you can check out this video tutorial:


