When it comes to installing or reinstalling Windows, there are several things to consider. Whether you’re a beginner or an experienced user, it’s always good to follow a complete guide with clear steps. In this article, we’ll provide you with a step by step guide along with images to make the process easier for you.
Step 1: Prepare Your PC
The first thing you need to do before installing Windows is to make sure that your computer is ready for the installation process. There are a few things that you need to check before proceeding:
Check System Requirements
The first and foremost thing to check before installing Windows is to make sure that your computer meets the minimum requirements. The system requirements for different versions of Windows can vary. You can check the system requirements for Windows 7, 8, and 10 online.
Back Up Your Data
It’s very important to back up all your important files and data before installing Windows. This is because the installation process will erase everything from your hard drive. So, it’s always a good idea to copy all your files to a USB drive, external hard drive or cloud storage.
Choose the Right Installation Media
To install Windows, you need to have a bootable USB drive or DVD that contains the Windows operating system. You can either buy a licensed copy of Windows or download the ISO file from the official Microsoft website. Once you have the ISO file, you can create a bootable USB drive or DVD using tools like Rufus or the official Windows USB/DVD Download Tool.
Step 2: Boot From Installation Media
Once you have a bootable USB drive or DVD, plug it into your computer and restart it. As soon as your computer starts, you need to enter the boot menu by pressing the appropriate key. The key to enter the boot menu varies depending on the computer manufacturer. It can be F12, F11, F10, ESC, or Del. Check your computer’s manual to find out which key to press.
Once you enter the boot menu, select the bootable USB drive or DVD and press Enter.
Step 3: Install Windows
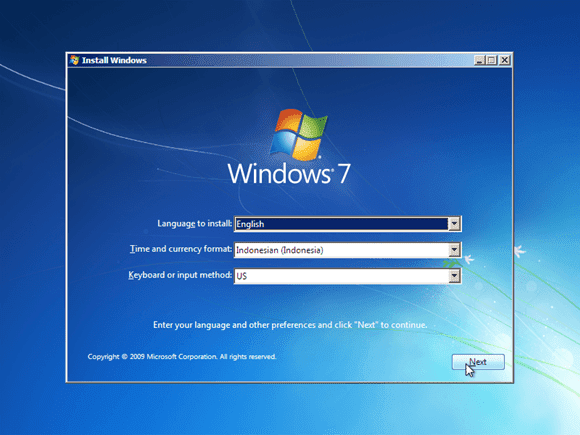
After booting from the installation media, you’ll see the Windows installation screen. Follow the steps below to install Windows:
Choose Language, Time, and Currency Format
The first step is to choose your preferred language, time, and currency format. Click on the Options link at the bottom left corner to select the desired options.
Enter Product Key
If you’re installing a licensed copy of Windows, you’ll need to enter the product key. The product key is a 25-character code that comes with the Windows installation media or is provided when you buy a license online. If you don’t have a product key, you can still install Windows but it will be in trial mode with limited functionality.
Accept License Terms
Next, you need to accept the license terms by ticking the checkbox and clicking on Next.
Choose Installation Type
There are two main installation types: upgrade and custom. If you’re installing Windows for the first time or want to erase everything from your hard drive, choose custom. Select the hard drive partition where you want to install Windows and click on Next.
Wait for the Installation to Complete
The installation process can take anywhere from 20 minutes to an hour depending on your computer’s speed and specifications. During the installation process, your computer will restart multiple times. You don’t need to do anything, just wait for the process to complete.
Personalize Your Settings
After the installation process is complete, you’ll be asked to personalize your settings. You can choose to customize your PC settings or use the express settings. We recommend using the express settings for convenience and privacy reasons.
Create a User Account
The last step is to create a user account. Enter your name and choose a username and password. You can also choose to sign in with your Microsoft account which will sync your settings and files across different devices.
FAQ
1. How can I reinstall Windows without losing my data?
If you want to reinstall Windows without losing your data, you can choose the upgrade installation type instead of custom. This will preserve your files, settings, and applications. However, we recommend backing up your important files before proceeding with the installation process.
2. How can I create a bootable USB drive for Windows installation?
To create a bootable USB drive for Windows installation, you can use tools like Rufus or the official Windows USB/DVD Download Tool. First, download the ISO file from the official Microsoft website. Then, open Rufus or the Windows USB/DVD Download Tool and select the USB drive. Browse for the ISO file and start the process. Once the process is complete, you’ll have a bootable USB drive for Windows installation.
Conclusion
Installing Windows can be a daunting task for beginners, but with the right tools and steps, it can be a breeze. Follow the steps mentioned in this guide and you’ll be able to install Windows without any problems. Don’t forget to back up your important files and data before starting the installation process.
If you’re still facing issues with Windows installation, you can check out Youtube tutorials for visual guidance. Below is a video that can help you with Windows 10 installation:
