Introduction
Have you ever tried to install a new operating system on your computer? It can be quite daunting for those who have never done it before. However, with the help of this tutorial, you can easily learn how to install Windows 7 with a CD. In this article, we will guide you step by step through the process of installing Windows 7 on your computer. So, sit back, relax, and let’s get started!
Step 1: Insert your Windows 7 CD
The first step in installing Windows 7 is to insert your installation CD or DVD into your computer’s CD/DVD drive. This will bring up the Windows 7 installation process and you will see a screen that says “Press any key to boot from CD or DVD…” Press any key to continue.
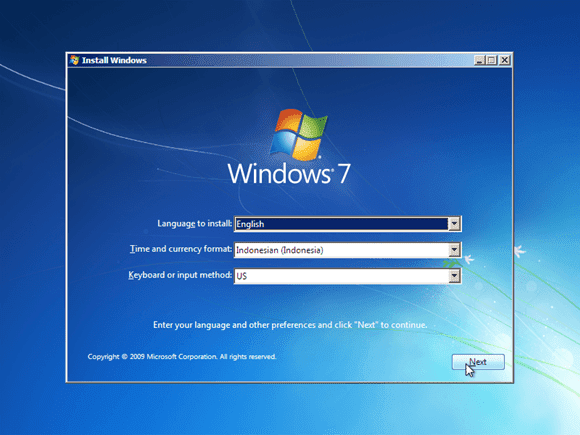
Step 2: Choose your language and click Install Now
The next step is to choose your language for the installation process. You will then be asked to click the “Install Now” button to start the installation process.
Insert CD
Insert your Windows 7 CD into the CD/DVD drive of your computer and follow the on-screen instructions to begin the installation process.
Step 3: Read and accept the License Terms
Before you can continue with the installation process, you will be asked to read and accept the License Terms. Once you have read and accepted the terms, click the “I accept the license terms” checkbox and click “Next” to continue.
Step 4: Choose the type of installation you want
Once you have accepted the License Terms, you will be asked to choose the type of installation you want. The two options are “Upgrade” and “Custom (advanced)”. If you are installing Windows 7 on a new computer or want to erase all the data on your current hard drive, select “Custom (advanced)”. If you are upgrading from an existing version of Windows, select “Upgrade”.
Step 5: Choose where to install Windows 7
After selecting the type of installation you want, you will be asked to choose where to install Windows 7. Select the hard drive you want to install Windows 7 on and click “Next” to continue.
Step 6: Wait for Windows 7 to install
Once you have selected the hard drive, Windows 7 will begin installing. This process can take anywhere from 20 minutes to several hours, depending on the speed of your computer. During the installation process, your computer may reboot several times. Do not interrupt the installation process.
Choose Language
Select the language you want to use for the installation process and click “Next” to begin.
Step 7: Set up your computer
Once the installation process is complete, you will be asked to set up your computer. This step includes setting up your username and password, setting up your internet connection, and choosing your computer’s name.
Frequently Asked Questions
Q: Can I install Windows 7 with a USB drive?
A: Yes, you can install Windows 7 with a USB drive. The process is similar to installing Windows 7 with a CD. You will need to create a bootable USB drive and insert it into your computer’s USB port to begin the installation process.
Q: What do I do if I don’t have a Windows 7 CD?
A: If you do not have a Windows 7 CD, you can purchase one from Microsoft or other software retailers. Alternatively, you can download an ISO file of Windows 7 from Microsoft’s website and create a bootable USB drive or DVD.
Conclusion
Congratulations! You have successfully installed Windows 7 on your computer using a CD. We hope this tutorial has helped you to understand the installation process and made it easier for you to install Windows 7 on your own. If you have any questions or comments, please feel free to leave them below. Thank you for reading!

