Are you a beginner in installing Windows 10? No worries, we got you covered! In this article, we will guide you step-by-step in installing Windows 10. But first, let’s talk about the benefits of Windows 10.
The Benefits of Windows 10
Windows 10 is a powerful operating system that has many benefits over its predecessors. Some of its benefits include:
- Improved functionality
- Full-featured start menu
- Cortana integration
- Built-in security
- Continuum for touch screen devices
With such a powerful set of features, it’s no wonder that Windows 10 is one of the most popular operating systems in the world. And now, let’s get started with the installation process.
Step-by-Step Guide in Installing Windows 10
Before you begin the installation process, make sure that you have these things:
- A Windows 10 installation disk or USB drive
- A computer with at least 4GB of RAM and a 64-bit processor
- A product key for Windows 10
Once you have these things, you’re ready to begin the installation process:
Step 1: Create a Windows 10 Installation Disk or USB Drive
The first thing you need to do is create a Windows 10 installation disk or USB drive. To do this, follow these steps:
- Insert your blank DVD or USB drive into your computer.
- Download the Windows 10 installation tool from the Microsoft website.
- Run the installation tool and choose the option to create installation media for another PC.
- Select your language, edition, and architecture, and then choose to create an ISO file or USB drive.
- Follow the instructions to create the installation media.
Once you have your installation disk or USB drive, you’re ready to move on to the next step.
Step 2: Backup Your Data
Before you begin the installation process, it’s important to back up your data so that you don’t lose any of your important files. To back up your data, follow these steps:
- Connect an external hard drive or USB drive to your computer.
- Open File Explorer and navigate to the files and folders that you want to back up.
- Select the files and folders that you want to back up and copy them to the external hard drive or USB drive.
Make sure that you’ve backed up all of your important files before you move on to the next step.
Step 3: Insert the Installation Media and Restart Your Computer
Now that you’ve created your installation media and backed up your data, it’s time to begin the installation process. To do this, follow these steps:
- Insert your Windows 10 installation disk or USB drive into your computer.
- Restart your computer.
- When your computer restarts, you’ll see a message asking you to press any key to boot from the installation media.
- Press any key to continue.
Your computer will now boot from the installation media.
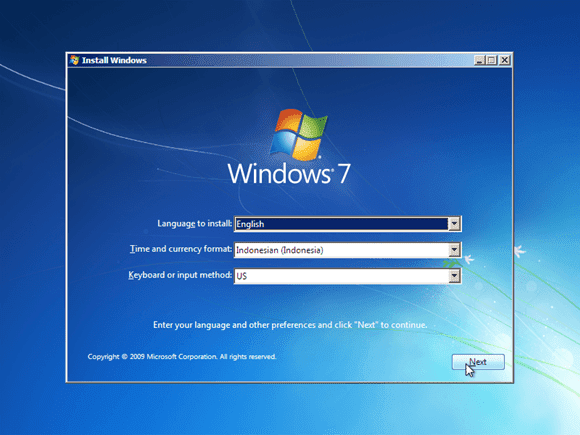
Step 4: Choose Your Language, Time and Currency Format, and Keyboard or Input Method
Once your computer has booted from the installation media, you’ll be asked to choose your language, time and currency format, and keyboard or input method. To do this, follow these steps:
- Select your language from the drop-down menu.
- Select your time and currency format from the drop-down menu.
- Select your keyboard or input method from the drop-down menu.
Once you’ve made your selections, click on the Next button to continue.
Step 5: Install Windows 10
Now that you’ve chosen your language, time and currency format, and keyboard or input method, it’s time to install Windows 10. To do this, follow these steps:
- Click on the Install Now button.
- Read and accept the license terms and conditions.
- Choose which type of installation you want to perform. You can either upgrade your current version of Windows or perform a clean installation.
- If you choose to upgrade, follow the on-screen instructions to upgrade your current version of Windows. If you choose to perform a clean installation, follow the on-screen instructions to install a fresh copy of Windows 10.
Once the installation is complete, you’ll be asked to create a user account and customize your settings. Follow the on-screen instructions to complete this process.
Frequently Asked Questions
Q: Can I install Windows 10 on a computer with less than 4GB of RAM?
A: No, you cannot install Windows 10 on a computer with less than 4GB of RAM. Windows 10 requires a minimum of 4GB of RAM to function properly.
Q: Can I install Windows 10 without a product key?
A: Yes, you can install Windows 10 without a product key, but you will not be able to activate it. If you don’t have a product key, you can still install Windows 10 and use it for up to 30 days. After the 30-day trial period is over, you will need to enter a product key to activate it.
Conclusion
Installing Windows 10 may seem like a daunting task, but it’s actually quite easy if you follow these steps. Remember to back up your data before you begin the installation process, and make sure that you have all of the necessary components, such as a Windows 10 installation disk or USB drive, a product key, and a computer with at least 4GB of RAM and a 64-bit processor. If you have any questions or concerns, don’t hesitate to ask for help.
Video Tutorial: Installing Windows 10
For a more visual guide to installing Windows 10, check out this video tutorial:


