Excel is one of the most popular tools used for financial data and analysis. The data you put inside an Excel spreadsheet can be essential for a company, so it is essential to make sure that your data is secure and cannot be altered by anyone who is unauthorized. Protecting your Excel file from unauthorized edits can be done easily by locking or protecting the sheet in which your data is present. Here in this article, we will discuss how to lock and protect Excel sheets from unauthorized changes.
Cara Nak Edit Data Excel Yang Diprotect
When you protect your Excel sheet, it prevents others from changing data or formulas. However, it still allows you to edit other cells that have not been locked. Here we are discussing the steps to edit data in a protected Excel sheet.
- Click on the Review tab on the Excel Ribbon and select the “Unprotect Sheet” option from the toolbar.
- Enter the password to unprotect the sheet if it is password protected.
- Select the cell in which you want to input data and make the changes.
- After making the changes, protect the sheet by going to the Review tab and selecting “Protect Sheet” again.
This is one of the simplest ways to edit data in a protected Excel sheet. But there are still some methods to make sure your data is secure and can’t be altered.
Cara Mengunci File Excel Agar Tidak Bisa Diedit
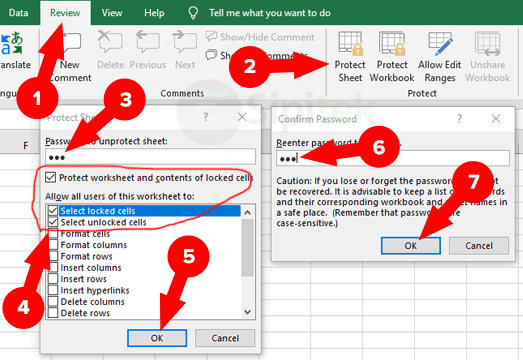
Excel also enables you to lock and protect the whole sheet, where users cannot edit anything, even the unprotected cells. Follow the steps below to learn how to lock and protect an Excel sheet.
- First, select the sheet that you want to lock and protect.
- Click on the “Format” button present in the “Cells” section of the “Home” tab.
- Select “Lock Cell” and then highlight the cells that need to be locked.
- Again go to the “Format” option, select “Protection” and click on “Protect Sheet”.
- In the “Protect Sheet” dialog box, tick on the options you want to prevent the users from doing.
- Type in a password to protect the sheet and click on “OK”.
Now your Excel sheet is locked and protected from any kind of alteration or unauthorized access to the data. However, there will still be instances where you might encounter some problems when trying to lock and protect your Excel sheet. Here are some frequently asked questions about locking and protecting Excel sheets that can help you in such cases:
FAQs
1. What is the difference between locking and protecting Excel sheets?
Locking cells in Excel means that you will prevent others from making changes to those cells. However, it doesn’t stop anyone from doing anything else with the sheet. When you protect a sheet, you automatically lock all of the cells and restrict all kinds of changes.
2. Can I protect an Excel sheet without a password?
Yes. You can protect an excel sheet without using a password, but you won’t have full protection. This means that others can still make changes to the cells, but they won’t be able to alter the locked cells. If you want to have complete protection, then it’s advisable to protect the sheet with a password.
Video Tutorial: How to lock and protect Excel sheets?
If you find it hard to follow the steps discussed above, you can go through the video tutorial given below. It explains the methods in-depth and gives a detailed walk-through of how you can effectively lock and protect Excel sheets.
Protecting your Excel sheet from unauthorized edits is an essential measure to ensure the security of your data. By following the steps discussed above, you can easily lock and protect your Excel sheets and prevent any unauthorized access to your data. If you still have any questions, you can refer to the FAQ section above or go through the video tutorial to get a better understanding of the methods discussed.

